[vc_row][vc_column width=”1/3″][dt_fancy_image type=”image” image=”http://www.kaufmanhomesinc.com/wp-content/uploads/kaufman-homes-kitchen-remodel-a-top-to-bottom-country-makeover-part-ii-floor-plans5.jpg” image_alt=”Remodeled Island” lightbox=”true” style=”1″ width=”270″ padding=”10″ margin_top=”0″ margin_bottom=”0″ margin_left=”0″ margin_right=”0″ align=”left” animation=”none”][dt_gap height=”20″][/vc_column][vc_column width=”2/3″][vc_column_text]
Kitchen Remodel: A Top to Bottom Country Makeover : Part II – Floor Plans
Note: This is the second posts of a three-part series. Please find the first post here: Kitchen Remodel: A Top to Bottom Country Makeover : Part I
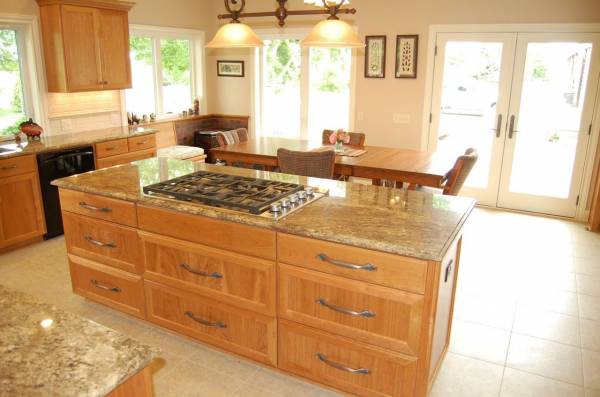
Although it might be difficult see, we added close to 5 feet of width to the kitchen. Clearly this was a lot of space to work with and we took advantage of that. We completely re-worked the placement of the appliances and made the space and efficiency of the kitchen vastly improve. Along with changing the appliances, we added an island with bar seating and elongated the nook changing the flow of the kitchen from being not very inviting to an area where people feel welcomed and most importantly comfortable.
Floor Plans: Before/After
[/vc_column_text][dt_gap height=”10″][vc_row_inner][vc_column_inner width=”1/2″][dt_fancy_image type=”image” image=”http://www.kaufmanhomesinc.com/wp-content/uploads/kaufman-homes-kitchen-remodel-a-top-to-bottom-country-makeover-part-ii-floor-plans.jpg” image_alt=”Kitchen Remodel Existing Floor Plan” lightbox=”true” style=”1″ width=”270″ padding=”10″ margin_top=”0″ margin_bottom=”0″ margin_left=”0″ margin_right=”0″ align=”left” animation=”none”][/vc_column_inner][vc_column_inner width=”1/2″][dt_fancy_image type=”image” image=”http://www.kaufmanhomesinc.com/wp-content/uploads/kaufman-homes-kitchen-remodel-a-top-to-bottom-country-makeover-part-ii-floor-plans2.jpg” image_alt=”Kitchen Remodel New Floor Plan” lightbox=”true” style=”1″ width=”270″ padding=”10″ margin_top=”0″ margin_bottom=”0″ margin_left=”0″ margin_right=”0″ align=”left” animation=”none”][/vc_column_inner][/vc_row_inner][vc_row_inner][vc_column_inner width=”1/1″][dt_gap height=”10″][/vc_column_inner][/vc_row_inner][vc_column_text]
Let there be light…
Windows were something that dramatically changed the feeling of the kitchen. By letting more natural light in, the space feels much more open and bright which is something that us Oregonians really start to appreciate once Fall has started to bring our famous rain.
The area where the sink is located only had a window over the sink. We decided that the view and more importantly the feel of that area would greatly benefit with more windows installed. Because we added cabinet space in other areas of the kitchen, the space that was lost for storage was gained in other areas which was important to our client.
Pull Yourself up to the Bar…
While the original layout did include a small island, we decided that this area was a lost opportunity that needed to be taken advantage of. Islands can be an area where not only storage can be added to the kitchen be seating can as well. Because of the layout of the room, we decided to rotate the island 45 degrees and have it face out towards the deck.[/vc_column_text][dt_gap height=”10″][vc_row_inner][vc_column_inner width=”1/1″][dt_fancy_image type=”image” image=”http://www.kaufmanhomesinc.com/wp-content/uploads/Kaufman-homes-Country-Kitchen-Remodel-After-1.jpg” image_alt=”Kitchen Remodel – After” lightbox=”true” style=”1″ width=”270″ padding=”10″ margin_top=”0″ margin_bottom=”0″ margin_left=”0″ margin_right=”0″ align=”left” animation=”none”][/vc_column_inner][/vc_row_inner][dt_gap height=”10″][vc_row_inner][vc_column_inner width=”1/1″][vc_column_text]Adding the bar area gave our client the informal seating that is needed for quick meals and at the same time, the space needed to serve the great meals that are being cooked in the beautiful kitchen.
Benches, hearths, and the corner…
The original hearth and stove took up valuable space in the kitchen and while the clients wanted to retain the stove they also wanted to add more functionality to that corner. We came up with the idea of adding a small bench with storage underneath along with completely re-working that corner.
Bench Area: Before/After
[/vc_column_text][dt_gap height=”10″][/vc_column_inner][/vc_row_inner][vc_row_inner][vc_column_inner width=”1/2″][dt_fancy_image type=”image” image=”http://www.kaufmanhomesinc.com/wp-content/uploads/kaufman-homes-kitchen-remodel-a-top-to-bottom-country-makeover-part-ii-floor-plans3.jpg” image_alt=”Fireplace Area Before” lightbox=”true” style=”1″ width=”270″ padding=”10″ margin_top=”0″ margin_bottom=”0″ margin_left=”0″ margin_right=”0″ align=”left” animation=”none”][/vc_column_inner][vc_column_inner width=”1/2″][dt_fancy_image type=”image” image=”http://www.kaufmanhomesinc.com/wp-content/uploads/kaufman-homes-kitchen-remodel-a-top-to-bottom-country-makeover-part-ii-floor-plans4.jpg” image_alt=”Fireplace Area After” lightbox=”true” style=”1″ width=”270″ padding=”10″ margin_top=”0″ margin_bottom=”0″ margin_left=”0″ margin_right=”0″ align=”left” animation=”none”][/vc_column_inner][/vc_row_inner][dt_gap height=”10″][vc_column_text]Instead of a large amount of brick, we decided to tone down that element while also adding a large window above that area to give it more light and more importantly open the corner up visually. Before, it was a closed in area that had space for the dog bed and stove but now, it takes on a whole new space that is inviting to relax after a hard day on the farm.
And just in case you were worried about where the dog now sleeps, he has been moved to the other corner. Underneath the area where the television is located we built a space just for him.
All jokes aside, the changes made to both corners changed this half of the kitchen dramatically. Instead of everything having a much more closed-in feel, the kitchen has an open and airy feel that has more seating and space for everyone.
Coming up…
In our next post, we will go over the details of the kitchen and point out areas that made this remodel really jaw dropping. From the subway tiles, to the industrial grade vinyl we will show you how we made this kitchen work for our clients tastes and lifestyles.
If you haven’t already… check out our first post on this kitchen remodel right here: Kitchen Remodel: A Top to Bottom Country Makeover : Part I[/vc_column_text][dt_gap height=”10″][/vc_column][/vc_row]

