
[vc_row][vc_column width=”1/3″][vc_single_image image=”1614″ css_animation=”left-to-right” img_link_target=”_self” img_size=”full”][dt_gap height=”20″][/vc_column][vc_column width=”2/3″][vc_column_text]
Laurel Springs Remodel: Winding Down
Kaufman Homes is in the final stages of this extensive remodel in Laurel Springs. Our schedule indicates we will be done close to the middle of March which means we will have done phases two, three and four in two and one half months (read about phase one here). I am pleased with the time frame, considering this remodel was an extensive project including all of the main living floor area ; kitchen, dining, living, utility and down ½ bath as well as a completely new master bath cabinet, counter, sinks and new faucets. The ability to move the family’s entire kitchen function to the basement mechanical room as well as have available a large family room off of the temporary kitchen providing reasonable accommodations. This family was a joy to work with as they allowed us the privilege of coming into their home, disrupting their normal lifestyle and being appreciative of the work my company and our workers were doing.
Moving right along in the process
In the proper and deliberate progression of any remodel or construction project, proper and logical order makes the job go smoother, faster as well as provides for better interaction for the family still living in the home. Our full time, highly skilled job manager has done a great job of coordinating the different trade contractors as well as doing much of the work himself. His goal is to always work with the customer to keep them informed of all stages of the project and to be considerate of the family’s daily function.
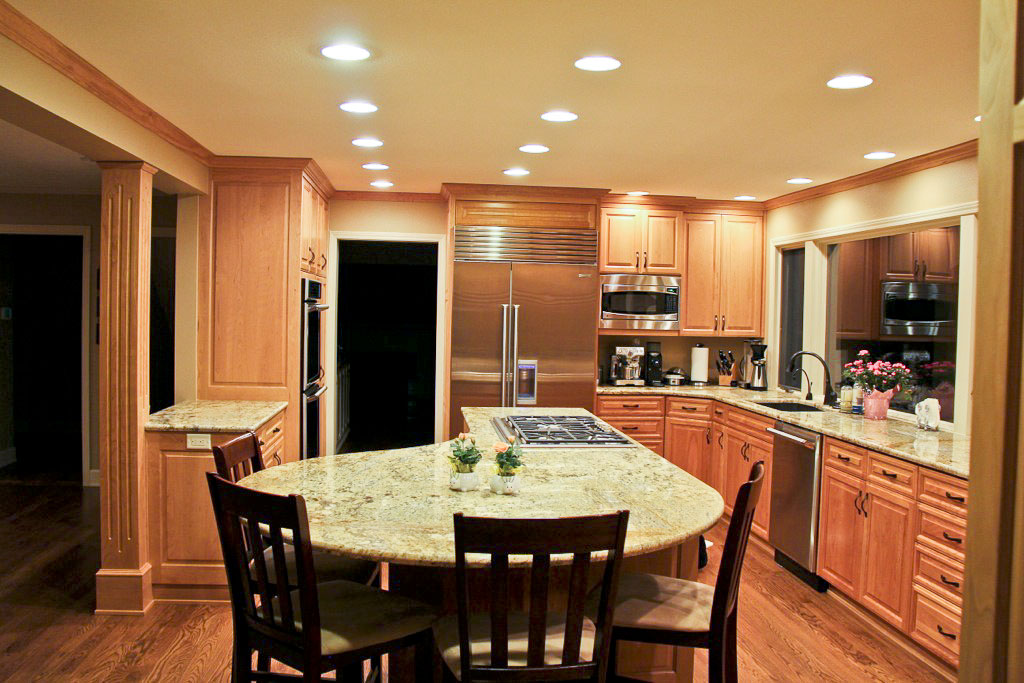
Moving in order, leaving off from our last correspondence from phase three, we are now ready to install the granite counter which also installs the undermount sinks. Next we did a decorative thin tile bead in the kitchen between the counter and the wall to break up where the granite meets the drywall. In the utility room we installed a 4” glass tile backsplash and in the ½ bath of the utility room a 4” tall decorative splash made up of different sized round glass tiles with a glass 1/2” cap on the top and ends. The master bath backsplash was of similar material. Glass tiles have become very popular as there are a variety of new and, interesting patterns to choose from.
Adding and Revitalizing Oak Floors
The entire main living area on the main floor now has oak hardwood floor which includes existing, patched or new oak hardwood flooring. We are now at the place where the hardwood floor Finisher comes in sands and applies the Swedish finish. This is a very delicate process as once the sanding process starts; there must be limited foot traffic. The final applied finish is a very smelly product that requires the owners and their pets to be gone for three to four days.
By slightly shuffling the schedule we were able to do this final finish step with the Owners going to the coast for a long weekend for one of the girls basketball tournament. On Sunday we opened up windows to dissipate the smell before they came home Sunday evening. To allow the family access to the temporary kitchen and their bedrooms upstairs we covered the minimum amount of floor with heavy paper. To allow for quicker curing we did not cover anymore of the floor until the following Tuesday. Finished in place hardwood floors take at least one month to achieve its full hardness. On Tuesday the rest of the floor was covered with the heavy paper to be left on for three to four weeks to allow the family as well as their three dogs to move around freely in the newly remodeled living areas without damaging a still delicate floor.
Taking Care of Loose Ends
Now it was time to move in the big sub-zero refrigerator which was carefully brought in by the appliance companies trained movers. We made a path from the front door to the opening by spreading out ¼” Masonite board. To protect a delicate newly finished floor. If we had not used the Masonite as a protective path, the rollers of the appliance dolly could have crushed the fresh finish and the floor would have to be refinished again.
New mirrors were installed in the master bath counter area, on the dining room hutch, and the utility 1/2 bath counter area. This needed to be done before faucets were installed which could hinder or make mirror installation more difficult. .
With the floor and backsplashes finished the plumber installed the dishwasher, faucets and garbage disposer. The Electrician trimmed out light switches, plugs, recessed light can trims and hooked up the garbage disposer, hot water dispenser, and dishwasher.
Our onsite job manager/technician proceeded to drill and install all cabinet knobs, nailed the base shoe on the new tall base to give a professional, detailed, layered look.
One of the last jobs was for the painter to do the final painting of the Baseshoe to cover the tiny nail holes. He also did the final touchup paint on different miscellaneous areas.
Finally at last we are ready for the cleaners to clean all the windows, dust all the counters and drawers, clean the ½ bath and make this new and beautiful remodel ready for the owners to resume normal living functions. I am sure this is a welcome relief for the homeowners to be able to resume normal living without workers coming in and out of their home.
Before & After Pictures of Living Room and Kitchen
[/vc_column_text][dt_gap height=”10″][vc_row_inner][vc_column_inner width=”1/2″][dt_fancy_image type=”image” image=”http://www.kaufmanhomesinc.com/wp-content/uploads/kaufman-homes-laurel-springs-remodel-winding-down2.jpg” image_alt=”Laurel Springs Remodel Before ” lightbox=”true” style=”1″ width=”270″ padding=”10″ margin_top=”0″ margin_bottom=”0″ margin_left=”0″ margin_right=”0″ align=”left” animation=”none”][/vc_column_inner][vc_column_inner width=”1/2″][dt_fancy_image type=”image” image=”http://www.kaufmanhomesinc.com/wp-content/uploads/kaufman-homes-laurel-springs-remodel-winding-down.jpg” image_alt=”laurel Springs Remodel Before” lightbox=”true” style=”1″ width=”270″ padding=”10″ margin_top=”0″ margin_bottom=”0″ margin_left=”0″ margin_right=”0″ align=”left” animation=”none”][/vc_column_inner][/vc_row_inner][dt_gap height=”20″][vc_row_inner][vc_column_inner width=”1/3″][dt_fancy_image type=”image” image=”http://www.kaufmanhomesinc.com/wp-content/uploads/kaufman-homes-laurel-springs-remodel-winding-down3.jpg” image_alt=”Laurel Springs Remodel After” lightbox=”true” style=”1″ width=”270″ padding=”10″ margin_top=”0″ margin_bottom=”0″ margin_left=”0″ margin_right=”0″ align=”left” animation=”none”][/vc_column_inner][vc_column_inner width=”1/3″][dt_fancy_image type=”image” image=”http://www.kaufmanhomesinc.com/wp-content/uploads/kaufman-homes-laurel-springs-remodel-winding-down5.jpg” image_alt=”Laurel Springs Remodel After” lightbox=”true” style=”1″ width=”270″ padding=”10″ margin_top=”0″ margin_bottom=”0″ margin_left=”0″ margin_right=”0″ align=”left” animation=”none”][/vc_column_inner][vc_column_inner width=”1/3″][dt_fancy_image type=”image” image=”http://www.kaufmanhomesinc.com/wp-content/uploads/kaufman-homes-laurel-springs-remodel-winding-down4.jpg” image_alt=”Laurel Springs Remodel After” lightbox=”true” style=”1″ width=”270″ padding=”10″ margin_top=”0″ margin_bottom=”0″ margin_left=”0″ margin_right=”0″ align=”left” animation=”none”][/vc_column_inner][/vc_row_inner][dt_gap height=”10″][vc_column_text]
A Successful Remodel
The success of a remodel, such as this one in Laurel Springs, is when the project totally looks like it fits the rest of the home,. The colors and different textures blend with a purpose, combining with the personality of the home and the Owners.
Kaufman Homes really appreciated working with this family and their three special dogs (who unconditionally greeted us every morning with wagging tails and gentle interaction).
A big thank you to you our wonderful family as you endured this unfamiliar process with the skills of a veteran![/vc_column_text][dt_gap height=”10″][/vc_column][/vc_row]